Thursday, January 25, 2018

Dolls' Eye View: Golden Globes 2018

This year's edition of the Golden Globes red carpet was as unique as the awards ceremony itself. It marked a change in culture where women stood up and spoke out against the culture of sexual harassment in the workplace. A group of 300 leading celebrities came together to launch the #TimesUp Movement--an initiative that hopes to put an end to the decades of sexual harassment, pay disparity and discrimination in both the entertainment industry as well as women everywhere who are struggling with the same issues. To mark their solidarity, many stars arrived on the red carpet, clad in black. While the gowns they wore weren't what I would call, extraordinary fashion, it was very elegant, making quite an impact on the red carpet. In fact, this was an excellent exercise in the power of black and the versatility of the basic black dress!

Zoe Kravitz wore a simple black velvet sheath from the house of Saint Laurent. This dress is a staple in my dolls' wardrobe because it serves as a blank canvas, on top of which, you can put absolutely anything. This is a strapless sheath. With a few modifications, it can be quickly transformed into several looks.
To get Dakota Johnson's elegant Gucci dress, all I had to do was to take the same sheath dress and add straps (1/8" ribbon), a belt (made from ribbon and a rhinestone earring), then tack a length of lame to the waist at the back. I love evening gloves, so I simply made two small tubes from the same stretch velvet I used to make the dress!
This Alberta Ferretti dress worn by singer, actress, Mary J. Blige, immediately attracted my girls' eyes thanks to the contrast of velvet and lame used in the dress. Again, I started out with a strapless black sheath dress. I scooped out an arc on one side of the sheath and sewed in (stretch) silver lame. I used the same fabric to make a single sleeve (a simple tube attached to the sheath). I rolled a small strip of the lame around the neckline and added a horizontal strap which drapes over the sleeve.

This is, again, another instance where I already had the strapless sheath lace dress. (The removable sleeves were taken from another dress.) Cut a large circle of fabric and tack the midpoint to the back of the waist. Voila, your doll now has the same look at Penelope Cruz who wore a lovely gown from the New York house of Ralph & Russo.
 I am not usually a huge fan of fishtail dresses. However, the body of this Dolce Gabbana dress worn by Mariah Carey reminded me of a vintage Patrick Kelly dress hanging in my closet. If this dress looks slightly familiar, it's because the body of the dress is the same as the sheer tulle Dolce Gabanna dress featured in my last post. This version is made from a lightweight rayon jersey using the same pattern. I simply added a diagonal strap across the shoulder and attached a fishtail (made the same as a circle skirt), just below the knees!
Here is the same dress (but without the fishtail), worn under a tailored bolero jacket. Very similar to the Tom Ford outfit worn by Gal Gadot.
We've seen this suit before (including here). This time around it is signed by Stella McCartney as worn by Claire Foy. It just goes to show the value in taking your time and making well fitting classic garments!
This is another classic beauty that will see a lot of wear in my house! Award winning actress Viola Davis looks wonderful in Brandon Maxwell. My girl had to have this dress too. This is a well fitting basic sheath dress (using a basic stretch dress pattern) in velvet where I've cut a sweetheart neckline. The good thing about stretch velvet is that it doesn't unravel as this dress is not lined (and has no closures)! The doll simply slips into this dress!
One shouldered fashion seems to be the big news of this red carpet,. Again, a very simple dress with a single sleeve as worn by Gillian Anderson.
The girls couldn't take their eyes off this very unusual dress by Versace and worn by Saorise Roman. This is a basic sheath dress with one square padded shoulder (with set-in) straight sleeve. The opposite shoulder is normal with a "jeweled shoulder pad"extending over the exposed arm. (For the doll version, I fashioned the pad out of oven baked clay which to which I applied glitter before gluing onto the shoulder!). The bejeweled triangle at the opposite side of the waist is an iron-on product which extends from the center of the back to the mid-point of the front. 
To create this empire waist, Giambattista Valli dress worn by Kendall Jenner, I retreated to my recent post on Tulle dresses!
We just love the old fashion glamour of a 50's inspired pant set, designed by New York designer, Christian Siriano for Christina Hendricks. For my dolly version, I made the top from a tube of black stretch velvet and fashioned a sash that stretches shoulder to shoulder out of taffeta--the same material used in the pants and over skirt. Think of the skirt as an apron worn with the fullness in the back and open in the front.
Since the fabric in my possession had the larger sequins, I chose Aayeesha, one of my Tonner dolls to dress. This Probal Gurling draped gown worn by actress, Kerry Washington, starts with a strapless hip length foundation, open on one side. I draped black sequined fabric (click HERE to see how) over the foundation so that the folds radiate from one side of the dress.


Follow us on Twitter: @FashDollStylist
Like us on Facebook: @FashDollStylist
We're also on Pinterest: @FashDollStylist
And of course, we are on Instagram: @fashiondollstylist

Friday, January 19, 2018

Tulles of the Trade--Red Carpet Edition

Not everything tulle has to a big ballgown. Surprisingly, there is a range of styles you can create. In this, part two of working with tulle, I wanted to explore red carpet looks. But full disclosure: There is a great amount of "thinking outside of the box" you won't find in any pattern drafting book. I took MANY liberties. But that's the fun of making doll fashions. As with Haute Couture....there are no rules. Whatever works and still looks good is perfectly acceptable!
Inspired by Oscar de la Renta's Spring/Summer '18 collection
 Case in point....this Oscar de la Renta dress. Princess line seaming was used in the body of this dress  to control shape. I chose not to use this construction because...for a 12.5" doll, there will be too many seams, particularly for a semi-sheer dress. For a question of ease and versatility, I decided to make this dress in two part instead of one. I also decided to make the top strapless instead of a traditional shell. The original dress is sheer from the top of the bust to the shoulders, thus giving the illusion her shoulders are bare. At the end of the day, a strapless top is not only easy, it still provides the look of the original dress! About mid-thigh, godets (triangular inserts) are sewn in. Again, I had considered cutting the skirt and sewing in godets, but then decided to take an easier route. Ultimately, here's how Lynn's dress came about.
1. For the top, I used a square of tulle. Measure from the top of the bust to the top of the hips and double that number lengthwise (because you will be folding the square over). Measure the body around the widest part of the bust and add an extra 1/2" (12mm) for overlap to each end (which falls at the back). For my doll, this square is 6x5" (152x127mm). Fold in half and sew each side (1/4" (6mm) seams). And turn the piece right side out.
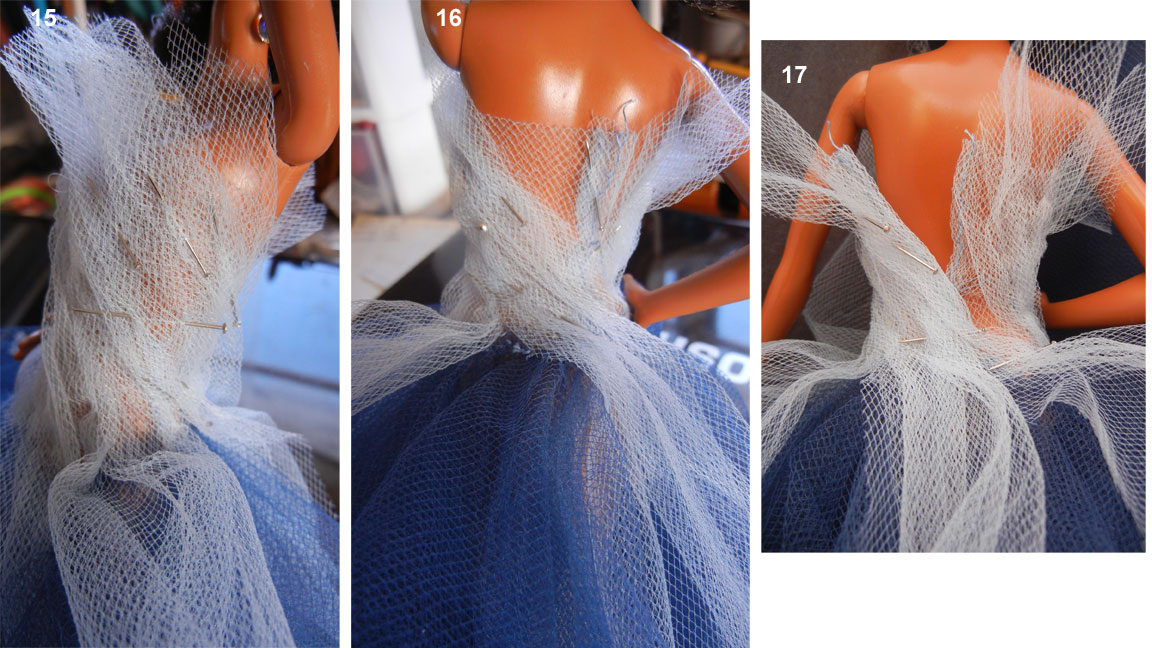
2. Place on the doll, overlapping the back by 1/4" (6mm)
3. In the front, you will notice the gap around the waist.
4. Pinch in a dart on each side of the body. (Don't worry, this will disappear under the glitter, later). Remove the top from the doll.  Note: You can sew in hook & eyes or snaps at this point.

5. Cover the doll's body with plastic wrap.
6. Put the top back on the doll over the plastic and close it down the center back
7. Make sure everything fits snugly.
8. Apply Modge Podge or white craft glue over the mid-section of the top right down to the edges.
9. Sprinkle on glitter. The glitter best simulates tiny silver beads of the original garment.
10. Allow to dry until the surface feels dry. I choose to apply more glue to the mid-section and sprinkle on a second layer of glitter for durability and depth. Again, allow to dry until the outer surface feels fairly dry. (It will not be dry, however!) Then CAREFULLY, remove the top from the doll's body and CAREFULLY peel away the plastic from the back of the top. What you will notice is how the top now has taken the shape of the doll's body. Allow he top tto completely dry. When dry, tap to get rid of the excess glitter. While the top is drying, let's make the skirt.
11. For the skirt, I'm using a bejeweled tulle over a second layer of plain black tulle. Using the same technique as I did with the top, I wrap the tulle around the body (around the widest part of the hips) to form a tube. It will not yet fit the waist. There will be a single seam down the center back. Fold one side over the other to form this seam and stitch flat up to the mid-point of the hips. On each side of the skirt, fold over the excess to form darts and stitch down flat. Leave the top as is. Tulle doesn't ravel and the top will lay over the skirt.
12. Next, cut tulle squares. Cut 4 full squares. Here's a hint. When you have lots of squares to cut, draw out the shape on a white piece of paper. Pin layers of tulle on the paper, and cut, using the drawing as a guide.
13. Cut 5 triangles (or diagonally cut half-squares).
14. Take the full squares, fold them in half and then in half again. Pick each one by the midpoint and pin to the skirt (about mid-thigh) at the center, each side and the back.
15. Attach the triangles in between the full squares. If you want more fullness, you can add more. If you want something less, don't add in the triangles.
You could cut away the under dress so that we see more of the legs, however, the dress is sheer enough as is, and since I used a bejeweled fabric, I liked seeing the sparkle through the layers of tulle.
This is a Pamella Roland dress I whipped up quickly for our last New York fashion report. This is what sometimes happens when I'm trying to get a report up fairly quickly. For this version, I started out with a hip length foundation (made from a glittery Christmas material). I gathered a length of tulle onto the bottom of the foundation and pinned it up in places to make a pouf. Lastly I took two lengths of sparkle grey tulle and wrapped it around the bodice and skirt. Visually, I was pretty happy with the result (though I hadn't completely figured out how the back should be finished). But then after I posted the report, I decided to come back and examine the photo more closely. What I noticed were the diagonal layers of ruffles(?) cascading down one side of the dress.
With that, I decided to make this dress again.
1. The base of this dress is a strapless sheath foundation I cut from my sparkly Christmas fabric. I also made a white lining which covers the body almost down to the knees.
2. I cut a triangle from tulle. The apex of this triangle to the midpoint of the hem should be as long as the distance between the top of the hips and the doll's toes. For Renne, this Barbie Model Muse doll, I drew a line 8" and then made another perpendicular to this one also 8" (203mm). Using a compass, I drew a curved line for the bottom. I cut strips of tulle 1x19"(2.5x48 cm) and gathered them to create lines of ruffles. Line them up with one edge of the triangle. Don't gather them too tight or else they will create too full of silhouette.
3. I have made 9 rows of ruffles, all parallel to each other. Stitch in place
4. Since I want to contain the fullness, I decided to press the ruffles down. Set your iron to a low setting, then cover the piece with a damp cloth and press.

5. Attach the apex of the triangle to the top of the hip. Wrap each side of the triangle around the body to the back. Pin along the edges of the insert to the foundation.
6. Where they meet, stitch together and tack the top edges to the foundation. The skirt part will have more fullness to one side.
1. Starting at the back, pin a strip of grey tulle into the seams high at the back of the foundation.
2. Spread the strip out and shape into pleats. Drape this from the back to the front diagonally. Here, I've pinned this strip at the side.
3. Move over the front of the bodice diagonally.
4. Pin in place as you work to get to the hips. As you work, try to pleat the fabric so that it falls into even folds.
5. Pin on the other side.
6. Pin at the back just over the top of the ruffled insert.
7. You decide what you want to do with the excess. I decided to let it drape down the back. In the photo below, here's where you are right now. Repeat the same process on the other side. When you are finished, here is what it will look like with the criss-cross of layers.

8. Sew your lining in. Place the right side of the lining to the right side of the dress. Stitch along the top and down 1" on each side. You can flatten that central back seam below that point with an iron. Close the opening with hook & eye.

Here's what both versions look like from the back. On the right, I let the light grey tulle stream down the back and a little on the side. On the right, the the grey tulle fits under the pouf of black tulle.
So which one is my favorite? They are the same dress but yet, two completely different garments. The new version is better made, but the first still has its charm!

When I am trying to replicate a designer dress from a photo, the challenges are numerous. I can't see the details of the garment, nor the back. I pretty much guess my way through. This allows me, sometimes, to toss out all the rules and come up with my own creation.
What I loved about the Marchesa dress (Fall/Winter 2015), is its cloud-like quality. I can't see exactly how those tulle layers were cut, but I do have an idea of the overall silhouette which is suspended from a necklace. Here's where you can be creative. I played a little bit and came up with the idea of making my own "tulle fringe."
My foundation is a dress with a modified halter neck bodice attached to an A-line skirt.
1. The top is made from a basic bodice sloper. I lower the neckline by 1/8" (3mm) and I place a mark 1/4" (6mm) down from the armhole.
2. Draw a curved line between the two points.
3. Trace this onto pattern paper and make it into one single piece by folding along the center front and tracing the left side onto the right. Add seam allowance.
4. For the back, place the front to the back sloper along the side seam. Where you have placed the mark below the armhole, start your line and draw down to the back center line. (You decide how low you want it. Mine is 3 1/2" up from the waist.) Should your line intercept the back dart, lower the dart. Move the apex down and then redraw the dart.
5. Add seam allowance.
Assemble your foundation.

Now let's make our fringe.

1. My fringe is roughly 1-1/2" long (3.8cm) Take a length of tulle and fold it down 1-1/2" (3.8cm). Fold it over itself about 8 times.


2. Stitch across the top.


3. Make a number of these wads in advance.


4. Beginning at the hem, we'll work our ways up. Line up each wad (stitch at the top, folds at the bottom), so that the bottom of the wad is roughly 1/4"-1/2" (6-12mm) over the hem of the foundation. The wads are straight but the hem of my dress is curved.  So you will need to cut them to go with the flow of the hemline.

5. As you need to curve up, cut the wad into a segment. Each segment should overlap.
6. Pin, then sew each segment in place, using the top stitching as a guide. Each row is about 1/2" (12mm) apart.
7. When you have finished this step, the dress will look like this.
8. Cut a 1" (2.5 cm) strip of ribbon to use as a hook for the necklace detail. If you don't have ribbon, make your own. Take a small strip of woven fabric and fold it into thirds. The end result should be about 1/4 inch (6mm) . Place this upside down at the center neck point of the dress bodice on top of the tulle layer. Attach the lining, right side to right side with the dress by sewing along the top of the dress. Turn the dress right side out.
9. When you have finished everything, now is the time to cut the fringe. Begin by cutting along the lower edge of each wad.
10. Next, cut vertical fringe.
11. My slats are roughly 1/4" (6mm) apart.
12. When you have cut all of the fringe, go back and with your fingers, separate the layers.
Here is our end result! A midnight summer's dream!
Front and back views of this very pretty dress.
Let's take a walk on the wild side with Dolce Gabanna's dress from their Spring/Summer '18 collection. I chose this dress because, I discovered tulle has quite a bit of stretch in one direction and wanted to explore this. Except for the bra under Tamrom's dress (center), there are no snaps, hooks or zippers. If you try this dress or something similar, just be careful to establish which direction the tulle stretches.
This is not a dress I would personally wear. But in the spirit of modern style, I thought it would be fun to bring this to life and to try and make it work. Essentially, this is a garment made to be worn over something else. The original dress is worn over what appears to be a 2-piece bathing suit. On the right, I've teamed it up from a one-piece borrowed from our Trash Couture post.
1. The pattern is made from the basic stretch dress sloper. I've restyled it into a strapless look.
2. The key to the "draping" lies in the added length. From the waist down to the floor, I've added nearly 10" (25.5 cm) (though you can add more if you want a more dense look).
3. When you lay out this dress, make sure the stretch is on the horizontal direction. I used a long stitch on both sides. Gather each side by pulling up the bobbin side stitch.
 
4. Wrong side up, I slip this onto the body of the doll to check for length.
5. Carefully remove from the doll. Turn right side out.
6. Then with a normal stitch length, sew very close to the edge to stabilize the sides.
Again, this dress needs something underneath. Pictured here is a fuller version of the panties featured in the tutorial HERE.
7. Put the dress back on the doll. Take a small strip of tulle. Twist in the center and pin to the midpoint of the bust. Wrap to each side and pin just in front of the arm.
8. Wrap around the arm and pin just in back of the arm. and pin.
9. Now, stitch everything in place.
What you will notice is the side seams are fully visible. You can, if you'd like, trim this. But be careful not to trim too closely to the seam edge. (You don't want to risk ripping the dress as you put it on and off of the doll.)
Up next....my girls' take on the Golden Globes red carpet!!!! (Hint: it's all about black dresses!)

All photos (except for the runway shots--courtesy of voguerunway.com) and text property of Fashion Doll Stylist. 2018. Please do not re-post without requesting permission and crediting us. Thank you.


Follow us on Twitter: @FashDollStylist
Like us on Facebook: @FashDollStylist
We're also on Pinterest: @FashDollStylist
And of course, we are on Instagram: @fashiondollstylist

Tuesday, January 9, 2018

Tulles of the Trade


Well, here it is....the first tutorial of 2018. I thought we should get the year started off on a festive note by delivering what I promised...a mega-tutorial on working with tulle! And it is huge! I've divided this project into two with this post featuring cotillion style ballgowns. These are great big, swash buckling, cake-top dresses one generally sees at sweet-16 coming of age parties, debutante balls and summer weddings!

There are two types of tulle commonly found in stores: crafting tulle which is cheap, course and quite stiff and dressmaking nylon tulle which is finer, not quite as stiff but still has body. Avoid the crafting tulle and spend an extra dollar (or Euro) or two on the fine variety (on the right). Still, the nature of this material is such that there is still quite a bit of body and it will jut away from the doll's body.
Crafting tool (left); dressmaking nylon tulle (right)
There is another variety: silk tulle. It is soft, drape more smoothly over the body but is expensive. It is used primarily for wedding dresses and high quality couture gown. Unless you are near a store catering to the wedding dress trade, you'll only find it online for as much as $50 a yard (or meter). For my tulle dresses, I am using an average priced nylon dressmaking tulle which costs about 3 US dollars a yard and is quite wide (45-54"). There are also fantasy tulle. This includes tulle speckled with glitter, felt polka dots or hearts and maybe even sequins, beads or lace. 

You can soften nylon tulle a little by dunking it in a bowl of boiling water for about 15 minutes then blotting it dry with a towel. Surprisingly, tulle can also be dyed! When sewing, it's best to use cotton covered polyester thread. For brights and dark toned garments, chose a color slightly darker than that of the tulle. There is also something called, "invisible" thread. This is a fine plastic thread I use for hand stitching light colored garments. It is not that easy to work with in that it is slippery and stretches. If you work with it, remember to work with a double thread, knotted at the end. And when you have finished your stitches, knot before cutting off the excess.
A basic foundation over which to build the dress.


Unfortunately we cannot make a dress or skirt with umpteen layers of tulle because of bulkiness. So each silhouette here has a underlying foundation (#1,2, or 3, for example) on which we "build" the dress.  Whenever possible, I like to use a sheer fabric for this because it maintains the lightness of the silhouette, disappears under the tulle while giving the illusion of many more layers of tulle.


I've started with something pretty simple. This is a dress designed by Jason Wu which appeared on the red carpet of the Oscars, last fall. For this look, I made a foundation made from a strapless bodice and an evening length circle skirt joined at the waist. (The technique of creating a dress from a bodice and skirt is explained HERE.) I've cut two layers of a sheer nylon fabric (like the kind used for old fashioned nightgowns) and two layers of sparkle tulle. Each part is sewn separately then joined at the waist. To see how I sewed the bodice, see the next dress just below. After put together the dress. I took scraps, bunched them together and tacked them to the dress bodice the same way we applied the embellishment on the corset at the end of the tutorial HERE. You could stop here or.....
You can make a separate tutu using the no-sew method (click HERE for the tutorial) to use as an overskirt.
Or....Take that same tutu and drape it around the doll's shoulders for use as an elegant (and extravagant) evening wrap!

Instead of a one piece dress, you can also make it in two parts: a corset with a separate skirt. This makes for a most versatile option which can later be mixed and matched with other elements in your doll's wardrobe.
1. Here is my one piece corset. Instead of cutting a separate lining, I have taken a piece of tulle, twice the length of the corset and folded it in half, vertically so that the folded edge falls at the top of the pattern piece. Add extra seam allowance at the center back.
2.  Note: You won't be able to trace the darts onto the tulle. But you can mark the apex and end points with hand stitches. Sew as you normally would. Trim the back seams down to 1/4" fold them inwards and sew shut. Take a strip of tulle and drape over the bust.
3. Tack this in between the bust at the center front point of the bodice. Turn the edges at the back under itself and tack in place
4. The skirt is a four-layered circle skirt topped with a 10x50" length of tulle all gathered into a piece of ribbon.
A dolly version of a vintage Christian Dior dress
But let's not forget that tulle dresses will be all the rage for Spring/Summer 2018 fashion trends So let's be inspired!
Giambattista Valli Spring/Summer '18 Haute Couture
Let's take this to the next level with a look inspired by the Spring/Summer 2018 collection of high fashion designer, Giambattista Valli. 

1. The foundation is a basic dress consisting of our #1 silhouette (strapless fitted bodice with attached circle skirt). I did not have a sheer fabric so I used a cotton for my foundation.
2. Next, I make a gathered skirt from 4 layers of tulle. For my 12" Barbie, I cut a length of 12" by 48" wide which is gathered into a waistband measuring approximately 1x10". The gathers only stretch over the doll's waist. The rest of the ribbon (on both ends) is left free.
3. Lay the tulle strip or ribbon, over the right side of gathered skirt and top stitch it flat. The part of the waistband not attached to the skirt will be tied into a bow in the back of the dress. At this point you have, essentially, an apron.
4. When you have finished sewing it, attach to the dress.

5. Take a length of tulle. Make a running stitch and gather down the middle.
6. Pull the gathers so that it fits the bodice of the dress. Baste in place.
7. Using the gathering stitch as a guide, sew this ruffle onto the bodice.
8. Since the top part of the ruffle is likely to fall forward away from the body, I tacked on a sheer ribbon waistband. (Optional)
 9. Separate the layers so that the upper ruffles fall towards the bodice while the lower ones dance over the waist.
10. Lift one layer of the tulle skirt in the center of the dress, midway between the hem and the waist.
11. Tack it to the waist to create a center ruffle with a cascading effect on the sides.
I'll be honest. When I finished, I did not like seeing the (cotton) dress underneath. So to mask it a bit, I tacked squares of tulle onto the underdress (underneath the tulle layers)!

The skirt part of the burgundy tulle gown has a distinct round shape. We can create a more triangular shape which remains voluminous but removes much of the bulk away from the waistline. I did this by by using the #1 foundation to which I attached folded squares of tulle to get this cascade of handkerchief points.
Dress by Maticevski, Spring Summer 18, Paris ready-to-wear collection
My inspiration came from this dress, by Polish born, Maticevski. I like the asymmetrical aspect of the skirt and the "vintage" spirit of the entire look. To start, I gave my tulle a boiled water bath and rung it out to introduce a bit of softness and texture.
1. I created foundation #1 using a soft, sheer nylon fabric. You could also use a chiffon, organza or cotton voile. The bodice is made using a strapless corset pattern attached to a full circle skirt.
2. I made a 4.5" (7cm) long ruffle and attached it to the bottom of the skirt.
3. Next, cut a series of tulle squares. Cut 8 squares: 12x12" (30x30cm) and 6 squares: 9x9" (22x22cm) One by one, fold into quarters and, hold it by the midpoint so that it is hanging in triangular shape. 
4. On the skirt, (in line with the bust point of the bodice) pin two squares about 5" (13cm) from the hemline. Pin two more, 2" (55mm) above those. Pin the last two at the waist. 
5. Pin the larger squares at the waist all around the rest of the skirt part of the dress. 
6. With everything in place, go back and stitch the squares onto the foundation.
7. At this point your dress will look like this.

8. You can go back and trim the shorter layers so that there is a more obvious difference in length from the longer ones.
9. Add a waistband. This can be sheer ribbon or a length of the tulle. It should be the measurement of the doll's natural waist plus enough to tie a soft bow in the back. Again, the waistband should be sewn flat against the layers underneath.
10. Close the back of the dress at the waist with a snap or hook&eye. Tie the waistband into a bow at the back.
11. You can clip the longer layers to make them more uniform near the hemline (or leave them as is).
It's now time to finish the bodice of the dress.
12. Cut a strip of tulle about 2x10" (5x26cm). Twist it twice at the midpoint then pin to the midpoint of the bodice. Pin also just at the underarm point of the bodice.
13. Pin just at the underarm point on the opposite side.
14. On each side, wrap around the doll's arm and pin at the underarm at the back.
15. It should look like this.
16. At the back near the center back seam, cut the excess away to about 1/4" (7mm). Tuck the tulle under itself and tack down.
17. You should do this while the back of the dress is open so as not to sew the doll into the garment! Close with hook and eyes.
This is a very sweet dress! If you're doll is a bit more sophisticated, there is another dress for her. It's based on this dress from Oscar de la Renta's Spring/Summer 2018 collection.
Dress by Oscar de la Renta Spring Summer '18, NY ready to wear.
 I did not have the exact colors. But what attracted me to this dress is the two-toned look and the diagonal swirl over the body. So for this dress, I used a baby blue and navy tulle.
This time the foundation is strapless knee length tulle dress.
1. I made this foundation directly on the doll's body using a double layer of light blue tulle. I cut a piece of tulle 8" long by 5" wide (enough to wrap around the body and then some). Fold the tulle in half to make a piece that is 4x5". Wrap it so that it fits just around the body.
2. Fold the left side over the right to create a center back seam. Pin in place. (Don't worry about the excess. We'll trim this away later.
3. Using a back stitch. Stitch up the back to about 1" or so (enough so that the doll can get out of the dress.)
4. On each side of the opening, fold under and stitch the edges down.
5. Be sure you knot your thread before you begin to sew and when you have arrived at the end point.
6. Fold the edges over the right side of the opening and stitch that edge down.
7. Remove the foundation. Turn inside out then carefully cut away the excess to within 1/8".
8. In the front it will look like this. Don't worry yet about the bulges at the waist. We'll fix those later.
9. Our skirt will be made up of only squares folded in quarters and attached to the foundation at the midpoints. I've used a navy blue tulle for the skirt. Begin in the center and add each midpoint close to the one before.
10. Continue until you have a full skirt. Stitch everything down.
11. Now, come back and pinch out a dart on either side of the foundation garment. It doesn't matter if this is not perfect. This will be covered and thus hidden from sight.
12. It's time to do the top. Take strips of tulle roughly 2.5x7" (62x180mm). To help you get started, gather one edge.
13 Pin to the bodice so that is draped diagonally across the body from one shoulder to the opposite hip. Pin in place. I tack this to the foundation, using "invisible thread." Stop when you get to the hips
14. Drape the next piece diagonally from the underarm to the hips, leaving extra fabric at the top (under the arm). Pin in place then tack to the foundation.
15. Continue until you have covered the foundation. This means part of the drape may start in the front and end at the hip in the back.
16. Just because to avoid the back seam where the dress needs to close.
17. Work the draped strips around this so that the dress closes as normal.
18. When you have finished, you will have these strips draped over the skirt part of the dress. You could decide you like them and let them be. Or you could decide to dip them beneath the top layers of the tulle squares of the skirt. Since they may not all fit will, I cut them vertically to split each strip in half.
19. Spread the tulle of the skirt open so that you see the foundation and pin down the lighter strips.
20. Adjust. When you are happy with the way it looks, stitch those to the foundation.
21. For the moment, this is what my dress looks like from the front...
22. And from the back. We need to trim the top of the dress.
 
23. Cut away so that the ruffles are more or less even. And voila!

In another version...
The principal is the same, except, in this case, the strips wrap around the midriff and drape freely over the foundation. Extra fullness is created by inserting triangles of tulle in between the strips.
My foundation is slightly different. I used a hip length foundation with a gathered skirt using a double layer of apricot tulle. I cut strips long enough to wrap around the bodice and fall to nearly the hemline (about 1-1/2" by 10" wide (Because my skirt was a bit too sheer for dolly's taste, I added in triangles of tulle in between the strips of tulle. You could, instead, make a sheer underskirt from nylon or chiffon.) At the top of the bodice, I sewed a small ruffle cut from cream white tulle. 
We're not quite finished here. Just because we're working in tulle, doesn't mean it has to be a ballgown. We have a few more ideas on modern look. Coming up next: part two...more sophisticated (not to mention modern) tulle dresses!


With the exception of the runway photos (courtesy of voguerunway.com), all photos and text property of Fashion Doll Stylist 2018. Please do not reproduce without prior permission. Thank You.

Follow us on Twitter: @FashDollStylist
Like us on Facebook: @FashDollStylist
We're also on Pinterest: @FashDollStylist
And of course, we are on Instagram: @fashiondollstylist